If you're looking to install the MTK Flash Tool on your PC, you've got a few steps to tackle before you can get started. First, it's essential to check that your system meets the requirements, like having a compatible version of Windows and enough RAM. Once you've confirmed that, finding a reliable download source is crucial. But what happens after you've downloaded it? The installation process can be straightforward, yet there are common pitfalls that could trip you up. Let's explore how to navigate these steps effectively.
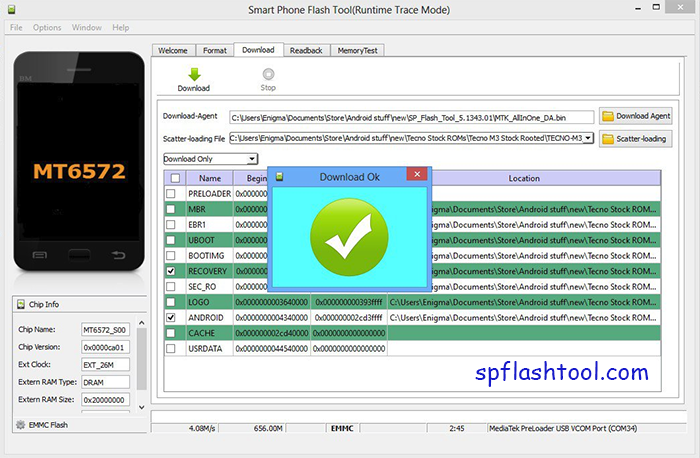
The MTK Flash Tool is commonly used to flash firmware and recover devices powered by MediaTek chipsets. If you own a MediaTek device, you'll find this tool invaluable for fixing software issues, upgrading firmware, or restoring your device to factory settings. Its straightforward interface makes it user-friendly, even for those who aren't tech-savvy.
When you use the MTK Flash Tool, you're essentially sending new firmware to your device, which can help resolve problems like boot loops or system crashes. You might need it if your device becomes unresponsive or if you're attempting to customize your firmware.
Before you start, ensure you have the correct drivers installed on your PC to prevent connectivity issues. Once everything's set up, you can follow a series of steps that involve connecting your device, selecting the appropriate firmware, and initiating the flashing process.
This tool supports various MediaTek devices, allowing you to manage multiple devices efficiently.
For a smooth experience with the MTK Flash Tool, you'll need to ensure your PC meets specific system requirements.
First, check that your operating system is compatible; Windows 7, 8, or 10 are generally recommended. It's also ideal to use a 64-bit version for better performance.
Next, make sure your PC has at least 2 GB of RAM. This amount of memory helps the tool run efficiently without lag. Additionally, you'll need a minimum of 500 MB of free disk space for installation and temporary files. A USB 2.0 or higher port is essential for connecting your device, so verify your ports before you start.
Don't forget to have the latest version of the Microsoft .NET Framework installed, as it's crucial for the tool's functionality.
Lastly, a stable internet connection is important for downloading any necessary drivers or updates.
To download the MTK Flash Tool, visit the official website or trusted sources to ensure you're getting the latest version. It's crucial to avoid sketchy sites, as they might host outdated or even harmful files that could compromise your PC. Once you find a reliable source, look for the download link prominently displayed on the page.
Before you click, check the version number to confirm it's the one you need. After clicking the link, your browser will prompt you to save the file; choose a location on your computer where you can easily find it later, like your desktop or downloads folder.
The file is usually compressed in a ZIP format, so ensure you have a file extraction tool ready, like WinRAR or 7-Zip. This will help you access the tool and its components once the download completes.
After the download finishes, you're one step closer to using the MTK Flash Tool. Just remember to verify the integrity of the downloaded file if possible, ensuring it matches the checksum provided on the website. This will give you peace of mind that you're set to go.
Now that you've downloaded the MTK Flash Tool, it's time to install it on your PC. First, locate the downloaded ZIP file in your Downloads folder. Right-click on the file and select 'Extract All' to unzip the contents. Once extracted, open the newly created folder.
Next, find the setup file, usually named 'MTK Flash Tool.exe.' Double-click on it to launch the installation process. If prompted by User Account Control, click 'Yes' to allow the installation to proceed.
Follow the on-screen instructions to complete the installation. https://spflashtool.com/ might need to accept the license agreement, so read through it and click 'Next.' Choose the installation location or stick with the default, then click 'Install.' The installation may take a few moments, so be patient.
Once the installation is complete, click 'Finish' to exit the setup wizard. You can now find the MTK Flash Tool in your Start menu or on your desktop. Open the tool to ensure it runs correctly.
That's it! You're all set to start using the MTK Flash Tool for your flashing needs.
Sometimes, users encounter issues while using the MTK Flash Tool, but many common problems can be easily resolved with a few troubleshooting steps.
First, if you can't connect your device, ensure that you have the correct USB drivers installed. You might need to uninstall and reinstall these drivers to fix any corruption.
If the tool fails to detect your device, try switching USB ports or using a different USB cable. Sometimes, compatibility issues arise from using outdated cables, so it's worth checking that, too.
Another common issue is the tool crashing during the flashing process. If this happens, make sure your software version is up-to-date. Running the latest version can significantly reduce crashes.
If you're experiencing error messages, pay attention to the specific codes displayed. Searching these codes online or consulting forums can provide tailored solutions.
Lastly, if the flashing process seems to hang, you may want to restart both your computer and device, then try again. Following these troubleshooting steps should help you resolve most common issues and get back to flashing your device smoothly.
In conclusion, downloading and installing the MTK Flash Tool on your PC is a straightforward process.
Just make sure your system meets the requirements, grab the tool from a trusted source, and follow the installation steps carefully.
If you run into any issues, don't hesitate to troubleshoot using common solutions.
With the MTK Flash Tool ready to go, you can effectively manage your MediaTek devices with ease.
Happy flashing!